Advanced Features
Autocompletion
It’s a sign that you’re really getting along when you can finish each other’s sentences. Let nvUltra complete your thoughts (or at least your words) for you.
Autocomplete Labels and Footnotes
In the , under Smart editing features, you’ll find options for “Autocomplete labels” and “Autocomplete footnotes.” When one or both of these are turned on, nvUltra will keep track of what titles you use in link and footnote references, autocompleting them for you when it detects you’re adding a link or footnote marker.
For example, if you had the following in your document:
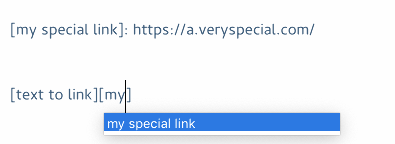
When you start to type a link, e.g. [text to link][], and your cursor is inside the second pair of square brackets, nvUltra will start offering you a list of existing links, narrowing it down as you type more characters. Press Return to accept the highlighted completion.
Smart Autocomplete
nvUltra keeps track of words you’ve used in the current document, autocompleting those in addition to the standard dictionary. After the first time you’ve typed out an unusual word like “adscititious,” that word is now in the autocomplete dictionary. Start typing “ads,” hit Option-Escape (or F5), and nvUltra will pop up a selection of completions for the word, including “adscititious”.
By the way, because nvUltra uses the escape key to end editing of a note or field, it doesn’t serve as the autocomplete key as it does in many other applications. If you miss that binding, you can change the settings in the (under Autocompletion) to restore it.
You can also edit the default dictionaries used by autocomplete to include completions in all of your documents automatically. In the , click the “Open Dictionaries Folder” button under Autocompletion. Dictionaries are text files with one word or phrase per line.
Smart Capitalization
When you use autocompletion, the case of the replaced string can be affected by the capitalization of what you’ve typed.
- All lowercase strings (
bsam) will leave the capitalization as it is in the source.- All caps strings (
BSAM) will uppercase the replacement
- All caps strings (
- Title case (
Bsam) will titlecase the replacement - Intercaps and other mixed cases (
bSAm) leave the replacement unchanged
Tab Completion of Folder Names
If you store notes in nested folders within your main notebook, notes within the subfolders appear in the notes list as Subfolder name/Note name.md. To add a new note within a subfolder, use the Tab key to complete the folder name, then add the name for the new note. A note created with “My Folder/My Note” would create “My Note.md” inside of a folder called “My Folder.”
Text Expansion
Under the , you’ll find a section called “Text Expansion.” You can enable and disable the feature here, as well as determine whether expansion happens instantly when a snippet is typed, or requires a space/punctuation character following it to trigger.
To create your own expansions, click the button in the Preference pane labeled “Open Expansions Folder.” There you’ll find a default.json file with some expansion examples that you can copy to a new file and start editing. The files are written in JSON, but even if you’re not familiar with JSON you can use the default.json as a base to start adding your own.
Each snippet has a “shortcut” and an “expansion.” The shortcut is what will be typed to trigger the expansion, and expansion defines what will be inserted in the editor instead. Including a punctuation character at the beginning of the shortcut (e.g. ,short) is recommended to avoid accidental triggering. Any punctuation character is allowed.
In the default.json file, you’ll find examples showing how to include the current date and time in your expansions. These use strftime formatting, which you’ll find documented here. Percent (%) symbols followed by a single character represent each part of a date/time string, and you can construct your own formatting as needed.
You’ll also find an example showing that you can use one snippet inside of another. By using the format %snippet:[trigger]% you can trigger one snippet within another. For example, if the snippet had a shortcut of .mmd, you could include it in another snippet using %snippet:.mmd%.
Note that changes to expansions require closing the current window and re-opening to take effect.
Undo Mode
nvUltra can undo your typing actions the way you always would: hit ⌘Z and make your last edit disappear. But you can go one step further by changing your Undo Mode under the . There, you’ll choose between Regular Undo, and History Mode Undo.
To explain History Mode, we have to first look at how regular undo handles the undo history. If you make three edits, then undo them, once you type anything in the document, there’s no way to redo the other two things you just undid. They’re lost. With History Mode, if you undo the three changes, then type something, you can undo the most recent change and then still use undo/redo to move back to the changes you removed initially. Give it a try!
AppleScript Support
Using AppleScript, nvUltra can provide information about the current folder and selected note. Use it to integrate nvUltra with other apps and utilities.
tell application id "com.multimarkdown.nvUltra"
    -- target the foreground window
    set _win to window 1
    -- Get the URL of the parent folder for the window
    get file of _win
    -- Get the URL of the currently selected note
    get note of _win
    -- Get an x-nvultra:// link to the currently selected note
    get note link of _win
end tell
URL Handler
You can use the x-nvultra: URL handler to create links that open notebooks, and search and create notes.
Methods
addthemeAdd an editor theme or preview CSS using a percent-encoded string. If the parameter containing the string is
css, a CSS style will be added. If it’stheme, an editor theme will be added. One ofcssorthememust be included, along with anameparameter:x-nvultra://addtheme?name=My%20Editor%20Theme&theme=[percent endoded string] x-nvultra://addtheme?name=My%20CSS%20Theme&css=[percent endoded string]find- (Compatible with the nvALT and Notational Velocity url handlers)
Start a search in the frontmost window with the
txtparameter:x-nvultra://find?txt=My%20NoteThe method can also be called with a path instead of a query parameter:
x-nvultra://find/My%20Notemake- (Compatible with the nvALT and Notational Velocity url handlers)
- Create a new note with the specified text (and optional title)
If no title is provided, it will be created using the first line of the text
x-nvultra://make?txt=My%20note%20text&title=My%20Note%20TitleThis method also accepts a
notebookparameter which will open a specific folder in which to create the notebook. You can use forward slashes in the note name to create the note in a subfolder of the notebook.x-nvultra://make?notebook=~/Dropbox/Notes&txt=My%20note%20text&title=My%20Note%20TitleopenOpen and search in a specific notebook. Provide either a full path to a note, or separate
notebookandnoteparameters:x-nvultra://open/~/Documents/My%20Notebook/ x-nvultra://open/~/Documents/My%20Notebook/My%20Note.md x-nvultra://open?notebook=~/Documents/My%20Notebook/¬e=My%20Note.md- This method is essentially a more full-featured version of the
findmethod, allowing specification of the parent folder. Thenoteparameter can be used likefind’stxtparameter, setting the search without having to be an exact file match.
Hidden Preferences
To set new values for the keys below, quit nvUltra, open Terminal, and run:
defaults write com.multimarkdown.nvUltra KEY VALUE
To return to the default setting, use:
defaults delete com.multimarkdown.nvUltra KEY
Be sure to quit nvUltra before running defaults commands. This avoids cached values overriding your new values, and prevents deleted values from causing issues with the running application. Deleted preferences will be restored to default on the next launch.
For advanced users, you can make changes to the editor appearance beyond what the themes allow using defaults:
| Key | Description | Value | Default |
|---|---|---|---|
NVTableColumnSpacing |
Spacing between columns | Float: pt | 28.0 |
NVTableFontName |
Font for file list | String: font | Avenir |
NVTableFontSize |
Font size for file list | Float: pt | 14.0 |
NVTableGridLineInset |
Divider line inset (affects width) | Float: pt | 14.0 |
NVTableRowSize |
Row size for file list | Float: pt | 48.0 |
NVTableRowSpacing |
Spacing between rows | Float: pt | 0.0 |
NVTableSelectionIndicatorWidth |
Note selection indicator width | Float: pt | 6.0 |
NVTableTextPadding |
Note name cell padding | Float: pt | 6.0 |
STInfoBarFontName |
Info bar font name | String: font name | Helvetica |
STInfoBarFontSize |
Info bar font size | Float: pt |
You can also control some behavior settings:
| Key | Description | Value | Default |
|---|---|---|---|
NVMoveFocusToSearchOnActivation |
Hotkey activation behavior | Bool | NO |
STTextFileExtensionWhitelist |
File extension whitelist | Array: File extensions | empty |
NVSuppressWikiLinkCompletionExtensions |
Suppress extensions when completing wiki links | Bool | NO |
Next up: Keyboard Shortcuts ▶
Search | Support Site | Legal | Privacy
▲